How to Use a Finish Nailer for Baseboards and Trim
To use a finish nailer for baseboards and trim, choose nails that suit the trim and backing, set the depth on scrap, then fasten into solid framing. Keep the tool square to the work and follow its manual and safety instructions.
On this page (9 sections)
- How do you use a finish nailer for trim?
- What nails should you use in a finish nailer?
- How do you set nail depth without damaging trim?
- Where should finish nails go on baseboards and casing?
- How do you fasten trim safely?
- Can a cordless finish nailer work for trim?
- What should you check before firing each nail?
- How do you finish nail holes and check the trim?
- Which finish nailer fits your trim job?
To use a finish nailer for baseboards and trim, choose nails that suit the trim and backing, set the depth on scrap, then fasten into solid framing. Keep the tool square to the work, use the correct firing mode, and follow the tool manual and safety directions.
A finish nailer can attach baseboards, casing, and other trim without the larger holes left by many framing nails. Good results depend on nail choice, careful placement, and a depth setting that holds the trim without marring it.
How do you use a finish nailer for trim?
Prepare the trim, test the nailer on scrap, and fasten into solid backing. Keep your hands clear of the nose, press the tool firmly against the work, and use one controlled shot at a time while learning the tool.
- Read the nailer manual and wear eye protection.
- Measure the trim and locate studs or other solid backing.
- Choose a compatible nail type and length.
- Set the depth on a scrap piece with similar trim and backing.
- Hold the trim in place and position the nailer square to it.
- Fire into the backing, spacing nails along the trim as needed.
- Check each fastener and fill small holes after installation.
Don't use a nailer to pull a bowed board into place. Hold the trim against the wall first, and use another method to correct a gap that the trim cannot cover.
What nails should you use in a finish nailer?
Use only the nail type, gauge, and length your tool accepts. The right length should pass through the trim and enter solid backing without coming out the other side.
A 16 gauge finish nail is a common choice for trim work, while a 15 gauge nail is thicker and can leave a larger hole. The choice depends on the trim, material, and tool.
See what gauge nailer to use for trim for help comparing those options.
For baseboards, measure the trim and account for any drywall between the trim and framing. Our guide to what size nails to use for baseboard trim covers that calculation.
Avoid guessing based on the trim alone. Check the nailer manual for its accepted fasteners, and check the trim manufacturer's directions if the material has special fastening requirements.
How do you set nail depth without damaging trim?
Test the depth on scrap before fastening visible trim. Adjust the tool until the nail head sits just below the surface, without crushing the wood or leaving a deep divot.
Use scrap that matches the trim and backing as closely as possible. A setting that works on one piece of wood may sit too deep or too proud on a different material.
Make small changes and test again. If the nailer has a tool-free depth control, use it as described in the manual; don't assume every model adjusts the same way.
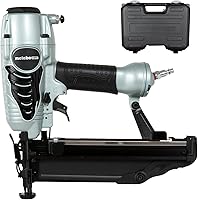
The Metabo HPT NT65M2S accepts 16 gauge finish nails from 1 in to 2 1/2 in. Its no-mar tip is intended to protect the work surface from unintended marks.
Keep the nose flat against the trim when firing. A tilted tool can leave a nail head at an angle or mark the wood, even when the depth setting is right.
Where should finish nails go on baseboards and casing?
Aim for solid backing and keep each nail away from trim edges. For baseboards, that usually means locating the wall studs before you start; for casing, check the underlying framing and follow the trim installation plan.
Mark stud locations lightly or use removable tape so you can see them as you work. If the wall surface hides the framing, use a suitable stud-finding method and confirm the position before firing.
On narrow trim, avoid placing nails too close to an edge or end, where wood can split. Test on scrap first, especially with brittle or thin material.
For corners and tight spots, plan the nail position before placing the tool. An angled magazine can help reach some confined areas, but the tool still needs stable contact with the work.
The Metabo HPT NT65MA4 accepts 15 gauge angled DA nails from 1 1/4 in to 2 1/2 in. Its maker describes it for base and crown molding, casings, chair rails, cabinets, exterior trim, and staircases.
How do you fasten trim safely?
Wear eye protection, keep your free hand away from the firing area, and use the nailer only as its manual directs. Treat the tool as ready to fire whenever it is connected to power or air and loaded.
Before loading, clearing a jam, or making adjustments, follow the manual's steps for disconnecting or disabling the tool. Keep the muzzle pointed away from yourself and others, and never carry a loaded nailer with a finger on the trigger.
Use sequential firing while learning the tool. Some nailers also offer contact or bump firing, which can fire when the nose contacts the work; choose modes only as the manual allows and the task requires.
For more precautions, read these nail gun safety tips for home projects. If the nailer misfires, jams, or behaves differently than expected, stop and follow the manufacturer's troubleshooting instructions.
Can a cordless finish nailer work for trim?
A cordless finish nailer can suit trim work when you want to avoid a compressor and hose. Check the nail type, length, battery requirements, and tool instructions before buying.
The Craftsman V20 CMCN616B is a cordless 16 gauge finish nailer. Its maker says it eliminates the need for a compressor, hose, and gas cartridge, and that it can drive up to 375 nails per charge.
The battery and charger are sold separately. The tool also has tool-free jam and stall settings, according to Craftsman.
A cordless tool may be a practical fit for occasional room-by-room work or places where setting up an air line is inconvenient. Compare it with other options in our guide to the best nail guns for trim and molding.
What should you check before firing each nail?
Check that the trim is aligned, the tool is square, and the nail path is clear. This quick pause can prevent misplaced fasteners and help avoid damage to wiring, pipes, or finished surfaces.
Press the trim into position and confirm the nail will enter solid backing. Keep the nailer stable, with the nose resting against the trim, rather than firing at an angle.
Use short, deliberate spacing based on the trim and installation instructions. Avoid crowding nails near corners or edges, where they may split the material.
If the nail doesn't seat correctly, don't fire another nail beside it immediately. Stop, inspect the fastener, and correct the depth or position before continuing.
How do you finish nail holes and check the trim?
Inspect the trim for proud nails, dents, gaps, and loose spots before filling holes. Set a fastener that stands above the surface with a suitable nail set, taking care not to dent the surrounding wood.
Fill small holes with a filler suited to the trim's material and finish. Let it dry as directed, then sand and paint or stain as needed.
If a nail misses the backing, remove or correct it before covering the area. A loose section may need a fastener placed into solid framing, rather than extra filler or a nail driven nearby.
Which finish nailer fits your trim job?
Choose a 16 gauge straight nailer when its compatible nails and tool setup suit the trim and backing. The Metabo HPT NT65M2S offers tool-free depth adjustment and accepts 1 in to 2 1/2 in 16 gauge finish nails.
Choose a 15 gauge angled nailer when its fasteners and angled magazine fit your trim plan or tight corners. The Metabo HPT NT65MA4 accepts 1 1/4 in to 2 1/2 in angled DA nails.
Choose a cordless 16 gauge nailer if avoiding a compressor and hose is useful, and account for the separate battery and charger on the Craftsman V20. For more tool choices, browse trim nailers and finish nailers or compare a finish nailer with a framing nailer before you start.
Frequently asked questions
What size nails should I use in a finish nailer for baseboards?
Choose a nail length that passes through the trim and reaches solid backing without emerging on the other side. Check the tool manual for the accepted nail type and length, and consider the thickness of both trim and drywall.
Our guide to nail sizes for baseboard trim explains how to make that choice.
Should I use a 15 or 16 gauge finish nailer for trim?
Either may suit trim, depending on the material, thickness, and how much holding strength you need. A 15 gauge nail is thicker than a 16 gauge nail and can leave a larger hole, so weigh that against the trim and backing.
Check the tool and trim instructions before fastening.
How do I keep finish nails from splitting trim?
Keep nails away from narrow edges and ends, and test the setup on scrap from the same material. If the trim is thin or delicate, choose a fastener and tool suited to it.
Follow the trim and nailer instructions, since material and nail placement affect splitting.
How deep should a finish nail sit?
Set the nail so its head sits just below the trim surface without crushing or denting the wood. Test the depth on scrap, then adjust the tool according to its manual.
The right setting can change with the material, nail length, and backing.