What Size Nails for Baseboard Trim?
For most baseboards, use 2 in to 2-1/2 in finish nails so the nail passes through the trim and drywall and reaches the framing. Match nail length to your trim thickness and wall, and use a shorter nail for thin trim or areas without a stud.
On this page (8 sections)
- What size nails for baseboard trim should you start with?
- How do you choose nail length for the wall?
- Should you use 16 or 18 gauge nails?
- How does baseboard thickness change the choice?
- Where should baseboard nails go?
- How do you set the nail depth?
- What should you check before buying nails?
- Which nail size should you use for baseboard trim?
For most baseboards, use 2 in to 2-1/2 in finish nails so the nail passes through the trim and drywall and reaches the wall framing. Check your board thickness and wall before choosing a length, and use a shorter nail for thin trim or spots without a stud.
The right nail size depends on more than the height of the baseboard. Nail length, gauge, wall material, and the location of wires or pipes all affect the choice.
What size nails for baseboard trim should you start with?
Start with 2 in finish nails for many standard baseboards, and consider 2-1/2 in nails for thicker trim or thicker wall layers. The goal is to pass through the baseboard and drywall and get a firm bite into framing.
Measure the baseboard at the point where you'll drive the nail. A nail that barely passes through the trim may not reach framing, while an overly long nail can hit something hidden in the wall.
Use nails that fit your nailer and follow the trim or tool maker's instructions. If you're unsure about the wall layers, test on an inconspicuous section and check the result before continuing.
How do you choose nail length for the wall?
Choose a nail long enough to pass through the trim and wall covering and enter a stud. Drywall thickness, board thickness, and any gap behind the trim change how much nail reaches the framing.
A simple estimate is to add the trim thickness, drywall thickness, and the desired depth into the stud. Treat that as a planning check, not a guarantee: the exact wall build and the nail's angle can change the result.
Don't drive long nails blindly near electrical outlets, switches, plumbing fixtures, or pipes. Check for utilities before nailing, and use a stud finder or other suitable method to locate framing.
For more on choosing among nailer types, see types of nail guns for home projects. If you need help matching a tool to your project, our nail gun basics guide covers common uses.
Should you use 16 or 18 gauge nails?
Use 16 gauge finish nails for thicker or heavier baseboards, and 18 gauge brads for lighter trim where smaller holes are useful. Both can work, but the board, nail length, and wall support matter.
A 16 gauge nail is thicker than an 18 gauge brad. That can make it a better fit for substantial trim, while a brad leaves a smaller hole to fill on narrower or lighter pieces.
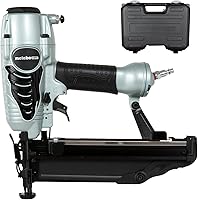
The Metabo HPT NT65M2S takes 16 gauge finish nails from 1 in to 2-1/2 in and has tool-free depth adjustment. Its range can suit baseboards when the selected nail length matches the board and wall.
For smaller holes on light trim, the DeWalt DWFP12231 drives 18 gauge brads from 5/8 in to 2 in. Its maximum length may be too short for some thick baseboards, so check your measurements first.
See what gauge nailer to use for trim for a closer comparison of trim nail sizes. You can also compare 16 gauge and 18 gauge nailers before choosing a tool.
How does baseboard thickness change the choice?
Thicker baseboards may need longer nails to reach the stud through the drywall. Thin or narrow trim usually calls for a shorter nail to reduce the chance of a nail point emerging where you don't want it.
Check the thickest part of the board, especially if it has a shaped profile. A nail driven through a thick lower section may need a different length than one driven through a thin upper edge.
Keep the nail centered in the trim's thicker area when possible. A nail too close to an edge can split the board, particularly at corners and narrow returns.
Where should baseboard nails go?
Drive nails into wall studs when you can, and place them where the trim is thick enough to hold them. Studs provide a more secure anchor than drywall alone.
Mark stud locations before installing long runs. Put fasteners near board ends and joints as needed, while leaving enough distance from the edge to limit splitting.
Don't assume every wall has standard stud spacing. Confirm locations as you work, and avoid nailing where you suspect electrical wiring or plumbing may run.
Can you nail baseboard into drywall alone?
Drywall alone is not a reliable anchor for baseboard. If a nail misses a stud, the board may loosen over time, especially at a joint or a spot that gets bumped.
Use the installation method recommended for your wall and trim. Adhesive or anchors may be options in some situations, but they should suit the surface and the board.
How do you set the nail depth?
Set the nail so its head sits just below the trim surface without crushing or splitting the wood. Test the setting on a scrap piece or an inconspicuous area before working across the room.
A nail set can help finish a nail that sits slightly proud. Fill the small hole with a compatible wood filler, then sand and paint or finish as needed.
The DeWalt DCN662B is a cordless 16 gauge finish nailer that drives 1-1/4 in to 2-1/2 in nails. Its tool-free depth adjustment lets you change how far nails sink for different materials.
For the installation sequence and tool setup, see how to use a finish nailer for baseboards and trim.
What should you check before buying nails?
Check the nailer’s gauge, angle or collation type, and accepted length range before buying a box of nails. A nail with the right length still won't work if it doesn't fit the tool.
Read the nailer manual for compatible fasteners, and match the nail to the work. Don't substitute a framing nail or another fastener just because it has a similar length.
For a general tool comparison, browse nail guns for trim and molding. If you need a 16 gauge option for trim, the Metabo HPT NT65M2S review explains its features and nail range.
Which nail size should you use for baseboard trim?
For many standard boards, 2 in finish nails are a practical starting point, with 2-1/2 in nails worth considering for thicker trim and wall layers. Choose 16 gauge nails for heavier boards or 18 gauge brads for lighter trim, provided the tool accepts the length you need.
Mark studs, check for hidden utilities, and test the depth before installing a full run. For a tool-by-tool walkthrough, follow our finish nailer guide for baseboards and trim.
Frequently asked questions
What size nails are best for baseboards?
For many standard baseboards, 2 in to 2-1/2 in finish nails are a useful starting point because they can pass through trim and drywall into framing. Check the trim thickness and wall construction first, and use a shorter nail if the board is thin or the nail could reach wiring or plumbing.
Should I use 16 or 18 gauge nails for baseboards?
Use 16 gauge finish nails for thicker or heavier baseboards when you want a stronger hold, and 18 gauge brads for lighter trim where smaller holes matter. The right gauge depends on the board and wall, so check the nailer’s allowed fastener size and the trim maker’s guidance.
Can I nail baseboard into drywall?
Drywall alone is not a secure anchor for baseboard. Aim nails into wall studs where possible, and use an appropriate adhesive or rated anchors only when the installation plan calls for them.
Check for hidden wires and pipes before driving nails near outlets, switches, or plumbing.
How far apart should baseboard nails be?
A common approach is to place nails about 16 inches apart where studs are located, with additional fasteners near board ends and joints. Stud spacing and trim shape vary, so mark framing first and avoid placing nails where they could split a narrow edge.